
For my Master Thesis at the University of Würzburg, I created a system that allows for seated, non-conversational agents to display differnt personality traits. These traits are conveyed via their animations and gazing behaviour.
Repository for Download: https://gitlab.com/jessi.topel/personality-enhanced-audience
Important: We are currently working on a paper based on this project, which should be published sometime in September 2023. If you want to use this project, or any part thereof, please cite our paper. Using this project without citing the paper and before the paper is released is not permitted. Thank you for your understanding.
System Description
The personality system consists of two sub-systems. Both can be used on their own or in combination with one another. The first sub-system is the Gaze System, consisting of the Personality Selected Attention Marker System, or PSAM for short, and a joint attention system. It controls the head rotation of the agents. The second sub-system is the animation system. This system deals with specific animation sequences that can be played on an agent’s skeletal mesh.

Gaze System
The Gaze System consists of two parts, the Personality Selected Attention Marker System and the Joint Attention System. Together, these two systems control the head rotation of the agents. The Personality Selected Attention Marker System can be used on its own, while the Joint Attention System serves as an extension that can be toggled on or off. In their current form, these systems should still be considered prototypes. The PSAM system has been used in two studies to validate it. The Joint Attention System has not yet been used in research.
Personality Selected Attention Markers
The Personality Selected Attention Marker System (PSAM) is a system to portray an agent’s personality by controlling their head rotation and thus what they are looking at, depending on the user’s gaze. The PSAM system consists of three parts, a Look at Marker every agent possesses, the Attention Markers themselves, and the Field of View Manager.
Agent’s Look at Marker
Each agent possesses a Scene Component which controls their look-at direction, simply called Look at Marker. The Look at Marker’s location can be changed by calling the Look At New Marker Event in the character blueprint. This event moves the Look at Marker to the location of a specified Attention Marker, using a Lerp and a Timeline as input for a smooth transition. It is then attached to the Marker to assure it is moving with the player if necessary and its position is continuously updated. The Timeline’s playback speed is adjusted according to the chosen personality trait, to allow for agents to seem more relaxed or frantic, for example.
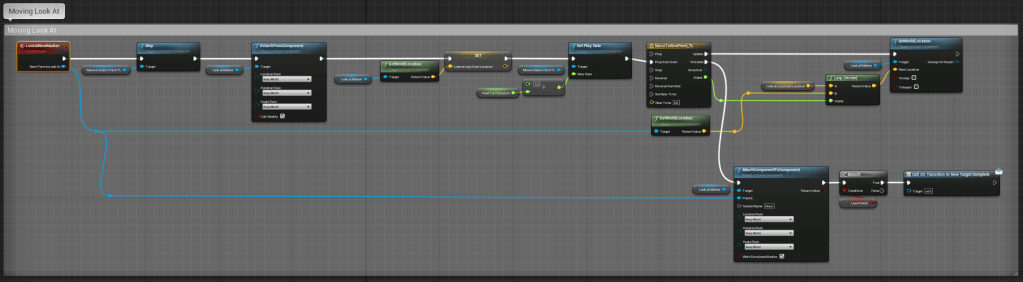
The rotation of the agent’s head itself is controlled in their Animation Blueprint, using Unreal Engine’s built-in Look At Function. To control the location the agent should look at, the location of their Look at Marker is fed into the Look At function, updating it every Tick.

Attention Markers
The Attention Markers themselves are implemented in a Blueprint Class that has to be spawned in the virtual environment. The markers are divided into three categories, the Body Markers, the Distraction Markers and the Presentation Marker.

The Presentation Marker moves along a spline path and can be used to simulate the agent’s reading a presentation slide behind the user. The Distraction Markers represent more or less random points in space. They are meant to simulate the agent’s being distracted by something or daydreaming.
The Body Markers represent different body parts of the user. The most important body marker is the eyes marker, which is used to simulate eye contact. Additionally, there are also two markers to each side of the player’s head, which can be used to simulate avoiding eye contact. Instead of the eyes marker, the agents would focus on these two markers and switch between them depending on whether the player is standing to the left or the right of the agent.
Field of View Manager
The Field of View Manager is also attached to the player character and tracks where the player is currently looking at. The Field of View Manager divides the player’s gaze into four sections, called Field of View Areas, or FOV Areas for short.
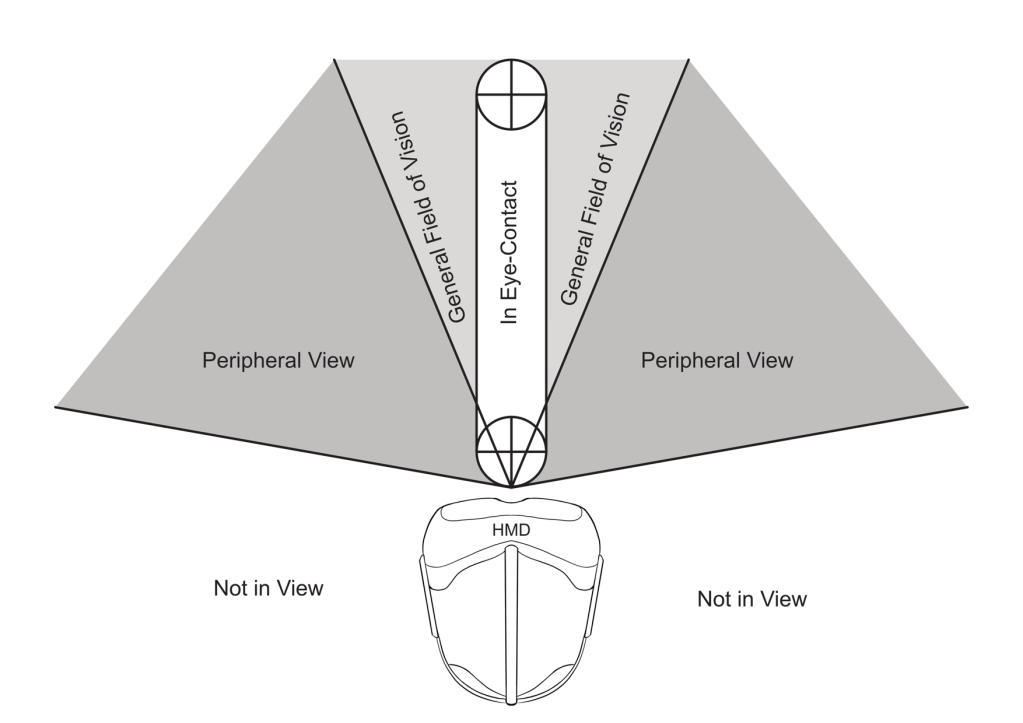
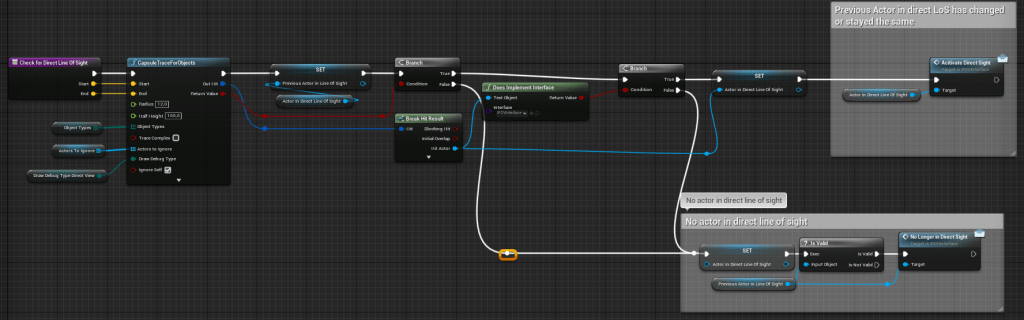
The first Area, referred to as the Eye-Contact Area, symbolized what the player is directly looking at and focusing on. This area is defined by a Capsule trace that gets swept along the Player Camera’s forward vector. The first agent hit by the Capsule trace is then defined as being within this Field of View Area. This also means that only one agent can ever be within the Eye-Contact Area.
The second Area is referred to as the General Field of View Area. This area represents the area in the player’s field of view where the player can still clearly see what is happening, but is not specifically focusing on. The third Area is the Peripheral View Area. This area encompasses everything in front of the player, which is not already included in the General Field of View Area or Eye-Contact Area. This area represents the area in the player’s field of view where things are still visible, but to clearly concern what is happening, the player would have to shift their gaze and focus.
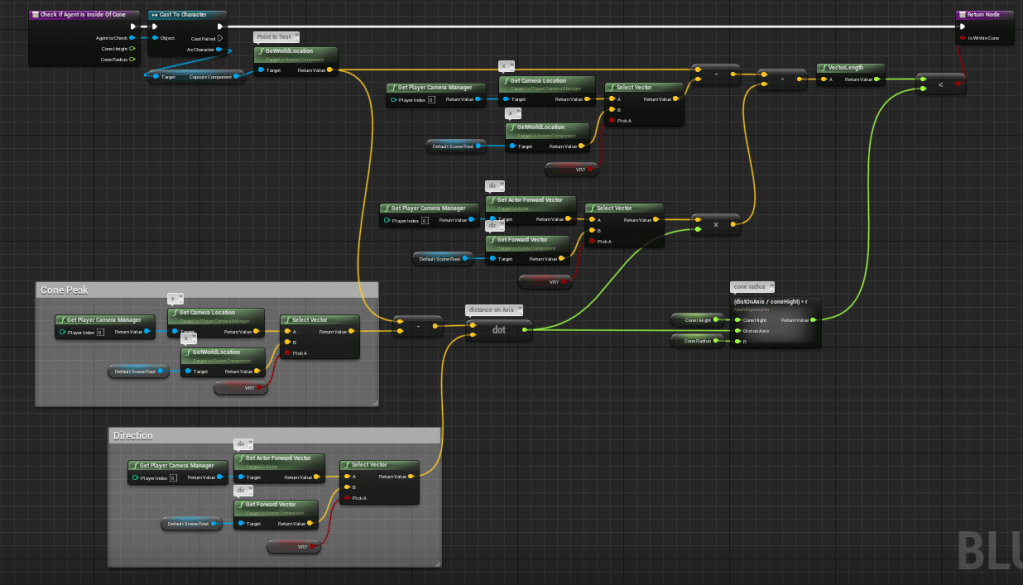
The radius of the cone defining the General Field of View Area and the Peripheral View Area can be freely adjusted in the Field of View Manager’s settings. To check if an agent is within one of these Areas, we calculate if their point of origin lies within one of the cones.

The fourth Area is the Not in View Area. This area encompasses everything that is not included in any of the previous areas.
The check for which Field of View Area the agents are in is calculated every tick. The information of which Field of View Area each agent is currently in is sent to the Agent’s Character Blueprint and stored as an ENUM. This ENUM is then read by the Agent’s Animation Blueprint, where it is processed by an Animation State Machine.

Whenever the Agent’s State in the State Machine changes, a list holding information about which Attention Markers they are currently allowed to look at gets updated. The Attention Markers the agent is allowed to look at depend on their Personality Trait and the Field of View Area they are currently in. For example, an Agent with the Neuroticism Trait will be allowed to look at the Attention Marker representing the Player’s feet, the Attention Markers for avoiding eye contact and the Marker representing the Player’s eyes, but only briefly, when this agent is currently in the Eye-Contact Area. When entering the Eye-Contact Area, agents will also show different behaviour depending on their personality trait.

The agents will automatically switch between the Attention Markers, after a specific amount of time has passed. The exact amount of time depends on their personality, which decides the average amount of time an agent spends looking at a target. This average is then modified by a random amount between – 5 and +5 seconds each time they switch the Attention Marker.
Joint Attention System
The Joint Attention System models a sort of curiosity behaviour, where some agents might follow the gaze of another specific agent, called a Leader, as if to investigate what this Leader is currently looking at. This is loosely based on the dominance dimension some other personality models include. It was included into my model to create some more natural behaviours and to allow the agents to also react to each other, rather than just the player. If an agent is following a Leader, they will always look at the same attention Marker their Leader is looking at.

This system was thought of and implemented very late during development, and the behaviours have not yet been fully formalized based on any specific research.
Animation System
The Animation System consists of four state machines, one for each personality trait.
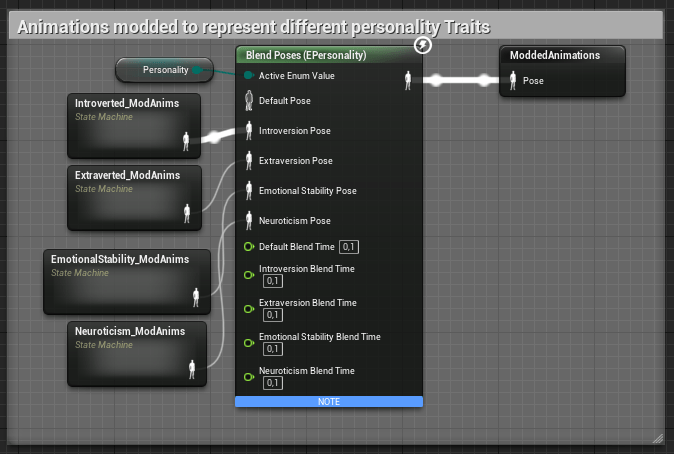
Currently, six different sitting animations exist per personality trait, which the state machines allow to switch between. Which one of these state machines will be used is determined by the Personality ENUM set in the Character Blueprint.
As animations are time-consuming and usually rather expensive to create, a partial goal of this project was to create more variety using already existing animations. Thus, the animations used were created by making changes to already existing animations, using Unreal Engine’s Control Rig Plugin. The changes were informed by different parameters I extracted from literature to create a guide on how to change animations in order to portray different personality traits. A list of all parameters I used along with with their base values can be found below.
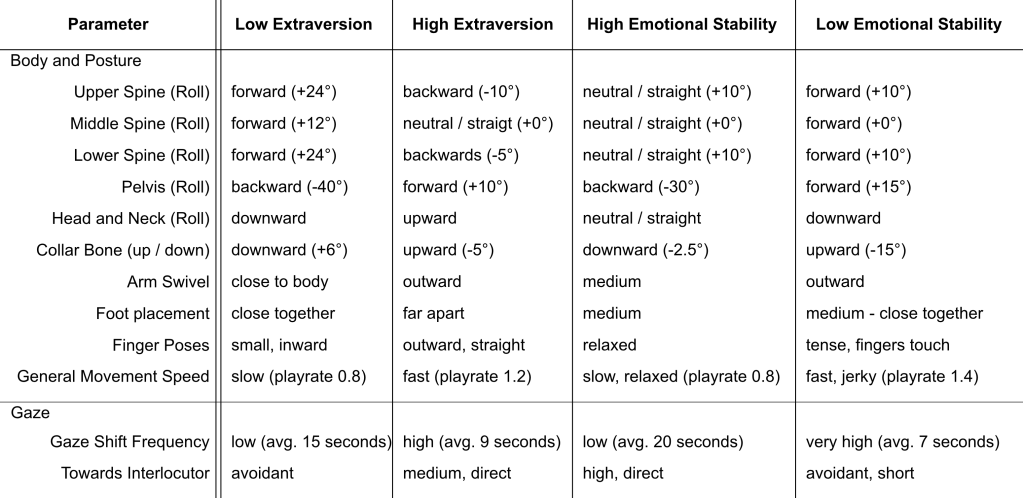
Apart from these, there were some additional parameters I identified, but did not include in the creation of the animations, as this would have been beyond the scope of this project. A full list of all 16 parameters across four categories can be found below as well.

